Detolf Assembly Instructions Step-by-Step Build
The IKEA Detolf glass display cabinet ships flat-packed with tempered panels, metal uprights, and dozens of fittings. Following a logical assembly order, using the right tools, and avoiding common mistakes keeps the frame square and the glass safe. This guide walks you from unboxing to final stability checks.
Tools Needed for Assembly
IKEA’s Detolf instructions assume you already own a Phillips-head screwdriver (cross-head). Choose one with a comfortable handle because you will drive many screws into metal channels. A magnetic tip helps hold small fasteners when working at awkward angles above the base.
Optional but helpful items include a soft rubber mallet for gently tapping metal bars fully into joints—never strike glass—a spirit level to verify the base, painter’s tape for temporarily holding panels, and a large blanket or rug to protect panes during layout. Keep a vacuum nearby to capture metal shavings so they do not scratch glass later.
Do not use power drivers on delicate hinge screws until you practice at low torque; overtightening can strip aluminum threads or twist the door rail.
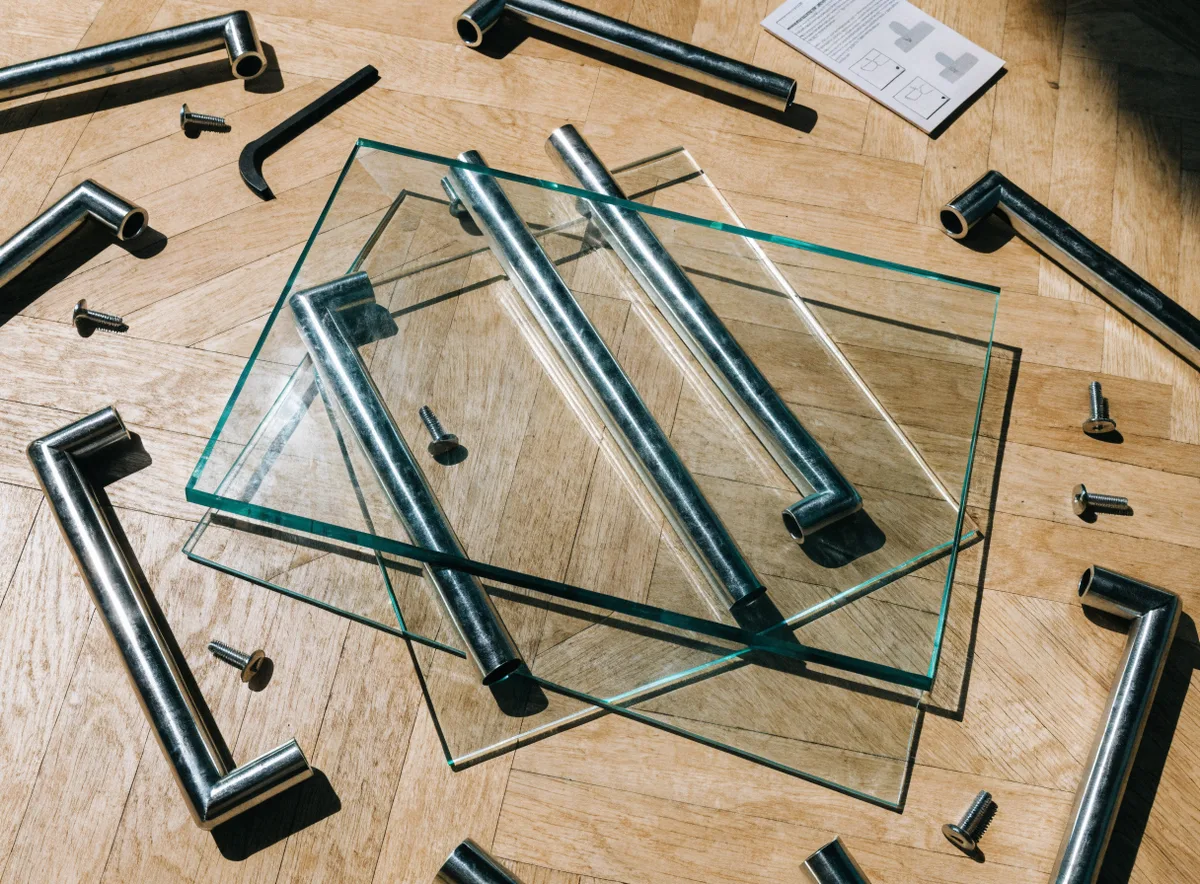
Unpacking and Checking All Parts
Open the box on a flat area large enough to lay out every panel without overlap. Inventory screws, shelf pins, hinges, and plastic bumpers against the parts list before you begin. Missing hardware is easier to resolve before partially built frames block access.
Inspect each tempered glass piece under good light. Reject any panel with edge chips or deep scratches; stress concentrates at defects. Wipe metal extrusions clean so grit is not trapped against glass when you slide panels into channels.
Recycle cardboard promptly to free floor space; clutter is a common cause of tripping onto glass.
Step-by-Step Assembly Process
1. Base frame and lower structure
Start with the base and lower metal frame as shown in the official diagram. Hand-start every screw to avoid cross-threading, then tighten in a crisscross pattern so the rectangle stays square. Confirm diagonals are equal with a tape measure; a skewed base telegraphs upward and makes doors gap.
2. Side panels and uprights
Attach vertical metal profiles next, keeping them parallel. This is the stage where a second pair of hands pays off: one person stabilizes while the other drives screws. Do not fully torque every fastener until the cabinet can stand without wobble; snug first, finalize later.
3. Back panel
Slide the back glass into its tracks from the top or side per booklet orientation. Move slowly and vertically; forcing a panel sideways risks corner blows. Once seated, add retainers or screws that clamp the glass without pinching one edge harder than the other.
4. Side glass and shelves
Install side panes, then insert shelf pins at your chosen heights before lowering shelves. Lower each shelf flat and level; rocking corners stresses tempered glass. Listen for pins clicking into holes.
5. Door and top assembly
Mount the hinge hardware, hang the door, and attach bumpers so metal does not tap glass. Finish with the top rail and cap, again checking squareness. Open and close the door slowly; adjust hinge screws until gaps look even top to bottom.
Build Order at a Glance
- Base frame — square and level first
- Uprights — parallel verticals, partial torque
- Back glass — slide, do not twist
- Sides, shelves, pins — even support
- Door, top — hinge tune, final tighten
Common Mistakes and How to Avoid Them
The costliest error is overtightening screws that bear on glass. Stop when resistance feels firm, not when the driver twists hard. Another frequent issue is assembling on carpet that hides unevenness; always shim until a level reads true on the base perimeter.
People often insert shelf pins at mismatched heights left versus right, producing a tilted shelf that slides. Count holes from the same reference on both uprights. Finally, rushing the door alignment step leaves a dragging sweep or uneven magnetic catch gap—adjust hinges before loading heavy collectibles.
Keep pets and children out of the work zone; bumped glass while unsecured is a common accident.
Assembling Alone Versus With Help
Solo assembly is possible if you lean tall panels against a wall between steps and use low furniture as temporary supports. Work top-down for hardware, bottom-up for glass insertion as the manual indicates. Take breaks; fatigue causes dropped corners.
A helper dramatically reduces risk when lowering the door glass or aligning the tall back pane. Communicate clearly—“lowering on three”—so both sides move evenly. If your helper is inexperienced, assign them stabilizing only while you drive screws.
Teams finish faster and usually achieve better squareness on the first try.
How Long Assembly Typically Takes
First-time builders should budget 60 to 90 minutes including inventory and cleanup. Readers who have built flat-pack furniture before often land near 45 minutes. Adding LED mods or deep cleaning every channel extends the clock.
If you exceed two hours, pause to re-check for a twisted frame or a misread step; forcing parts usually means something is backwards.
Troubleshooting Alignment Issues
When the door rubs or shelves rock, diagnose systematically. Place a level on the base, then on a shelf. If the base is level but shelves slope, re-seat pins at matching indices. If the whole cabinet leans, loosen corner screws slightly, plumb the unit with shims, and retighten evenly.
Gaps beside the door often trace to the top rail being skewed. Loosen hinge-side screws a turn, shift the rail until margins look parallel, and retighten. Never pry glass with metal tools; use suction cups sold for window installation if you must reposition a heavy pane.
Persistent twist after moves may mean bent metal; compare uprights to a straightedge and contact support for replacements.
Post-Assembly Stability Checks
After completion, perform a gentle shake test at mid-height while empty. The cabinet should feel solid, not resonant. Revisit every visible screw after 24 hours; metal can settle slightly after first load.
Install an anti-tip strap if children or large pets share the home. Anchor into stud or rated drywall anchors, not just trim. Confirm the door self-closes or stays open predictably so vibrations from nearby speakers do not slowly work it ajar.
Only then load collectibles, distributing weight evenly across each glass shelf as recommended in our dimensions guide.
Related Guides
Frequently Asked Questions
What tools do I need to assemble a Detolf?
A Phillips-head screwdriver is essential. A soft mallet can seat metal joints; never hammer glass directly.
How long does Detolf assembly take?
Expect 60–90 minutes your first time; experienced builders often finish in about 45 minutes with a helper.
Can one person assemble a Detolf alone?
Yes, with patience. Use a wall for support, square the frame before glass, and never rush large panes.
Why are my Detolf shelves crooked after assembly?
Usually the frame is twisted, pins are uneven, or the base is not level. Loosen corners, re-square, level the base, then re-seat pins at matching heights.
Find Your Detolf Cabinet
Now that you know the exact dimensions, explore where to buy a Detolf or discover similar alternatives that fit your space.